ShopDreamUp AI ArtDreamUp
Deviation Actions


Description
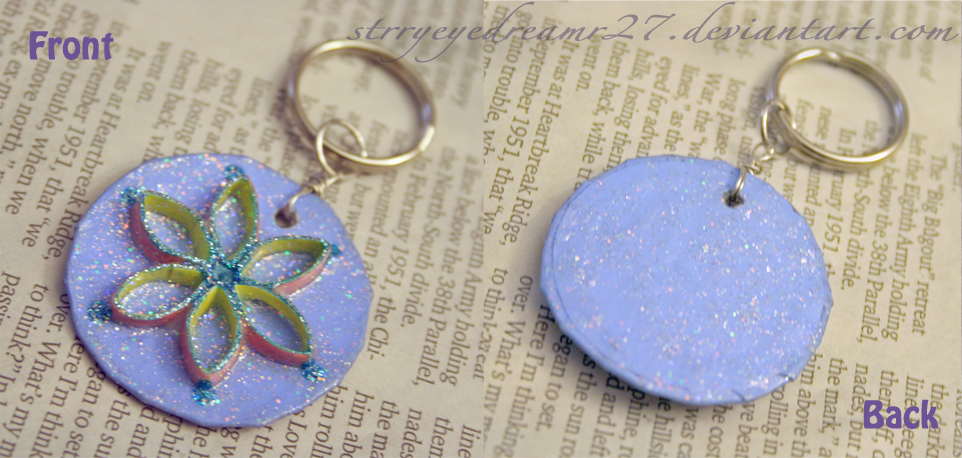
Key chain I made using recycled paper! Yup, that's right, another recycled paper project!
I love it! I made up this new little project just so I could make a tutorial based on it, but I'm still having trouble putting said tutorial together...boo...
[EDIT - August 31, 2010]
Will now be an entry for 's Recycled paper contest. And the following is what I had typed out for the tutorial (with a few edits), but couldn't quite get all the pictures and set up figured out:
Recycled Paper Flower Pendant Key Chain
Supply List:
• Old copy paper printouts
o i.e. old research, rules for contests, bad prints
• Thin cardboard
o i.e. cereal boxes and cracker boxes
• Newspaper
• Tape
• Pen
• White Glue
• Glue Stick
• Scissors
• Acrylic Paint (I used red, blue, yellow and white)
• Paintbrushes
• Mod Podge
• Glitter Glue
• Wire
• Key Rings
• Jump Rings
• Pliers
• Small Hole Punch
• Hair Dryer
• Templates (circle #1 and #2, rectangle)
Instructions:
Prep –
• Tape newspaper down to cover and protect work surface
o Keep an extra piece of newspaper on the side to use as a “glue mat” to catch excess glue in later steps.
Flower –
1. Take a sheet of copy paper to be recycled and split into fourths.
a. Set 2 pieces aside for use in “Base” instructions.
2. Take one of the two remaining pieces and fold in half/unfold.
3. Place your reserved newspaper “glue mat” underneath the folded/unfolded paper. Spread white glue evenly across printed side of paper, all the way to the edges.
4. Once glue is spread, fold paper back in half and flatten to seal.
5. Repeat steps 2-4 with second piece of paper.
6. Glue the two pieces you now have, together making sure to spread the glue all the way to the edges again and aligning the edges as evenly as possible. Allow your new four-layer piece to dry completely.
Note: if you’re impatient (like me) or just want to speed up the process, use the hair dryer to help you along.
7. Now that the glued piece is dry, pick a color for the “inside” and paint one side of this piece. Allow piece to dry fully.
Note: I chose yellow, with a white undercoat.
8. Use the rectangle template to measure proper-sized rectangle.
9. Cut rectangle.
10. Carefully curve and curl the rectangle to create a tube, colored side in.
11. Put a bead of glue along one edge and overlap to create the completed tube shape.
Note: this part can get a little messy, as you need to hold the edges together until the glue sets.
Tip: use the pen to aid in this process by placing it through your tube and push up with the pen while pushing down on the seam line to help glue set fully.
12. Once the glue has dried and the seam is set, choose a color for the outside and paint the outside of the tube covering any stray glue in the process. Allow paint to dry.
Note: I chose a pink created from red and white paint.
13. Cut seven rings from the tube in equal widths; discard the first piece, as the end will be uneven.
Note: when cutting the tube, it will flatten which is fine, but because of this fact, try to cut it so that the seam is at the cutting point.
14. Reshape the flattened rings to create pointed almond shapes that are all fairly even in shape.
15. Put a dot of glue on either side of the point of one of the “petals” and place another of the shapes on either side so the points almost touch.
16. Repeat this process with the other three shapes, and then glue the two sets of three together to create the full flower. Set aside to allow glue to dry.
The Base –
1. Take one of the pieces of paper set aside earlier. Choose a color for the base/background of the key chain, and paint the blank side of the paper. Set aside to dry.
Note: I chose a medium-light blue mixed from blue and white. Also, the glue stick is the “glue” that is being referred to in this set of instructions.
2. Trace Circle Template #1 (the larger one) on a piece of the thin cardboard and cut circle for base.
3. Glue circle on back (non-colored) side of the painted paper.
4. Cut around the circle, leaving approximately ½ a centimeter or so excess around the cardboard.
5. Cut slits to make wrapping the excess paper around the edges of the cardboard easier. Wrap and glue excess down around the edges.
6. Trace Circle Template #2 on the back of the remaining painted paper. Cut circle.
7. Glue this smaller circle on the back of the cardboard circle to cover the remaining visible area of cardboard.
8. Use the small hole-punch to make a hole through the newly put together round base near the edge.
Putting it all together –
1. Glue the flower in the middle of the circle base with the white glue, leaving the hole visible between two petals.
2. Add accents with glitter glue. Allow glues to dry.
Note: I use it to finish the exposed white edges of the flower. Also to fill the center of the flower and a dot at each point to help secure the flower to the base.
3. Coat with 2-3 layers of Mod Podge to seal and weather proof, allowing piece to dry between coats and fully after final coat.
Note: I used Hologram Silver Glitter Mod Podge, but you can use plain gloss or matte or whatever other sealer you might like.
4. Cut a short length of wire to create a loop through the hole of the piece and use the pliers wrap excess wire around said loop.
5. Add a jump ring and attach to key ring.
And voila! You have just completed a flower pendant key chain almost entirely created out of recycled materials!
I love it! I made up this new little project just so I could make a tutorial based on it, but I'm still having trouble putting said tutorial together...boo...
[EDIT - August 31, 2010]
Will now be an entry for
's Recycled paper contest. And the following is what I had typed out for the tutorial (with a few edits), but couldn't quite get all the pictures and set up figured out:Recycled Paper Flower Pendant Key Chain
Supply List:
• Old copy paper printouts
o i.e. old research, rules for contests, bad prints
• Thin cardboard
o i.e. cereal boxes and cracker boxes
• Newspaper
• Tape
• Pen
• White Glue
• Glue Stick
• Scissors
• Acrylic Paint (I used red, blue, yellow and white)
• Paintbrushes
• Mod Podge
• Glitter Glue
• Wire
• Key Rings
• Jump Rings
• Pliers
• Small Hole Punch
• Hair Dryer
• Templates (circle #1 and #2, rectangle)
Instructions:
Prep –
• Tape newspaper down to cover and protect work surface
o Keep an extra piece of newspaper on the side to use as a “glue mat” to catch excess glue in later steps.
Flower –
1. Take a sheet of copy paper to be recycled and split into fourths.
a. Set 2 pieces aside for use in “Base” instructions.
2. Take one of the two remaining pieces and fold in half/unfold.
3. Place your reserved newspaper “glue mat” underneath the folded/unfolded paper. Spread white glue evenly across printed side of paper, all the way to the edges.
4. Once glue is spread, fold paper back in half and flatten to seal.
5. Repeat steps 2-4 with second piece of paper.
6. Glue the two pieces you now have, together making sure to spread the glue all the way to the edges again and aligning the edges as evenly as possible. Allow your new four-layer piece to dry completely.
Note: if you’re impatient (like me) or just want to speed up the process, use the hair dryer to help you along.
7. Now that the glued piece is dry, pick a color for the “inside” and paint one side of this piece. Allow piece to dry fully.
Note: I chose yellow, with a white undercoat.
8. Use the rectangle template to measure proper-sized rectangle.
9. Cut rectangle.
10. Carefully curve and curl the rectangle to create a tube, colored side in.
11. Put a bead of glue along one edge and overlap to create the completed tube shape.
Note: this part can get a little messy, as you need to hold the edges together until the glue sets.
Tip: use the pen to aid in this process by placing it through your tube and push up with the pen while pushing down on the seam line to help glue set fully.
12. Once the glue has dried and the seam is set, choose a color for the outside and paint the outside of the tube covering any stray glue in the process. Allow paint to dry.
Note: I chose a pink created from red and white paint.
13. Cut seven rings from the tube in equal widths; discard the first piece, as the end will be uneven.
Note: when cutting the tube, it will flatten which is fine, but because of this fact, try to cut it so that the seam is at the cutting point.
14. Reshape the flattened rings to create pointed almond shapes that are all fairly even in shape.
15. Put a dot of glue on either side of the point of one of the “petals” and place another of the shapes on either side so the points almost touch.
16. Repeat this process with the other three shapes, and then glue the two sets of three together to create the full flower. Set aside to allow glue to dry.
The Base –
1. Take one of the pieces of paper set aside earlier. Choose a color for the base/background of the key chain, and paint the blank side of the paper. Set aside to dry.
Note: I chose a medium-light blue mixed from blue and white. Also, the glue stick is the “glue” that is being referred to in this set of instructions.
2. Trace Circle Template #1 (the larger one) on a piece of the thin cardboard and cut circle for base.
3. Glue circle on back (non-colored) side of the painted paper.
4. Cut around the circle, leaving approximately ½ a centimeter or so excess around the cardboard.
5. Cut slits to make wrapping the excess paper around the edges of the cardboard easier. Wrap and glue excess down around the edges.
6. Trace Circle Template #2 on the back of the remaining painted paper. Cut circle.
7. Glue this smaller circle on the back of the cardboard circle to cover the remaining visible area of cardboard.
8. Use the small hole-punch to make a hole through the newly put together round base near the edge.
Putting it all together –
1. Glue the flower in the middle of the circle base with the white glue, leaving the hole visible between two petals.
2. Add accents with glitter glue. Allow glues to dry.
Note: I use it to finish the exposed white edges of the flower. Also to fill the center of the flower and a dot at each point to help secure the flower to the base.
3. Coat with 2-3 layers of Mod Podge to seal and weather proof, allowing piece to dry between coats and fully after final coat.
Note: I used Hologram Silver Glitter Mod Podge, but you can use plain gloss or matte or whatever other sealer you might like.
4. Cut a short length of wire to create a loop through the hole of the piece and use the pliers wrap excess wire around said loop.
5. Add a jump ring and attach to key ring.
And voila! You have just completed a flower pendant key chain almost entirely created out of recycled materials!
Image size
962x458px 451.74 KB
© 2010 - 2024 strryeyedreamr27
Comments3
Join the community to add your comment. Already a deviant? Log In
It is amazing what you can do with paper.